Art-Class.net
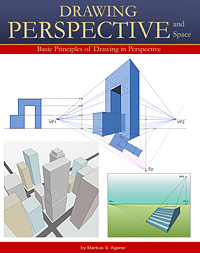
Now we come to a simple exercise in the field of perspective drawing. In this exercise we will try to draw a cuboid in a central perspective with one vanishing point – the so called one-point perspective.
It is one of the simplest tasks in the field of perspective drawing* and is thus suitable for beginners in this area. If you do not have any experience with perspective drawing, you can also visit the following tutorial, which describes the basics and fundamental terms:
Basic of drawing in perspective
To make the method easily comprehensible to everyone, I show the emergence of the cuboid step by step. As a small pre-taste I show you the finished drawing already in the picture below - with a little color.
.png)
In the first step we introduce the basic elements of the perspective drawing. The horizon and the vanishing point are necessary. Principally both can be drawn where you want. However, with respect to the realization of the drawing, not every position really makes sense.
.png)
Now you need two vanishing lines, which determine the width of the cuboid. Along these vanishing lines the lateral edges of the cuboid will run.
.png)
With the aid of the two vanishing lines one can represent the ground surface of the cuboid. You simply drag two horizontal lines from one vanishing line to the other. Thus the extent of the cuboid has been defined in depth.
The lateral edges (left and right) are obtained by simply tracing the vanishing lines between the two horizontal lines.
.png)
At the front two corner points, two lines are drawn vertically upwards. These lines represent the edges of the front face of the cuboid.
.png)
In the fifth step, two further vanishing lines are drawn which intersect the two vertical lines. This sets the height of the cuboid. It is important that the two vertical edges of the cuboid are cut at the same height. Step 5 can be carried out together with step 6, which is possibly even easier.
.png)
With this step, we have also drawn all necessary vanishing lines. As you can see, all vanishing lines arise from the same vanishing point. This is a characteristic of the one-point perspective and makes this kind of perspective comparatively easy.
Now we draw the top, front edge of the cuboid. For this purpose, the two intersection points between the vertical lines and the upper lines of the escape are connected by a horizontal line. Sounds more complicated than it is - just look at the picture below.
The horizontal line would automatically result in the intersection point for the second vanishing line. We have already drawn this in point 5. One could also proceed in such a way that only one vanishing line is drawn, then the horizontal upper edge of the cuboid and then the second escape line.
.png)
In the seventh step, two further vertical lines follow at the two rear corner points of the floor surface. They represent the rear edges.
.png)
The new intersections can be connected again to each other by a horizontal line in the same way as in step 6.
.png)
Now you only have to draw the upper surface of the cuboid. In the one-point perspective this is done by simply tracing the upper vanishing lines - in the area between the two upper, horizontal edges.
.png)
The perspective drawing of the cuboid is already finished. To finish, you simply have to remove the unnecessary construction elements (vanishing point, escape lines and hidden edges). The hidden edges are depicted in light gray in the drawing below.
.png)
That’s it - the representation of the cuboid is finished. As you can see, drawing with the one-point perspective is not difficult. Of course, this example is a very simple exercise for drawing the central perspective. With more complex objects, the difficulty increases significantly.
If you want to learn more about the perspective drawing, I recommend my eBook or my (printed) book, in which the basics are described.
This website is about how to draw and paint. You will learn to use pencil and brush and how to drawn and paint your own pictures.