Art-Class.net
In this tutorial I would like to describe how to draw a picture step-by-step. The main focus here is on the basic approach for creating your own drawings, no matter if you draw with charcoal, pencil, graphite etc.. So, how can you draw your own pictures step by step?
First of all, I would like to point out that while drawing a picture, everyone has its own way to do things. The procedure I will described on this page is therefore only a suggestion with which I can show how to draw a drawing in four steps. However, in fact, most drawers will work very similarly as I do.
That’s why I think it's going to make life easier for a beginner, when one uses the method of the four steps for a drawing. With increasing drawing skills, one or the other will develop its own methods and approaches.
From the blank sheet of paper to the finished drawing, there are four steps:
1. Creation of a simple sketch
2. Prepare the sketch for a preliminary drawing
3. Shading the preliminary drawing
4. Error correction and refinement
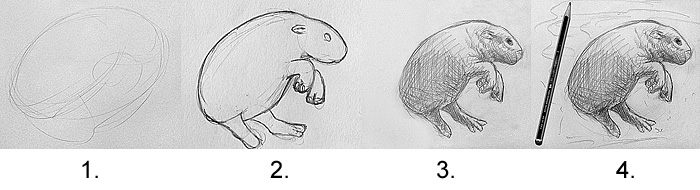
In this tutorial a still life serves us as an example. The first step on the way to a finished drawing is to create a simple sketch. In doing so, you first define the area that the motif will occupy on the drawing paper. This prevents you from reaching the limits of the paper.
Now, one roughly sketches the most important elements of the picture within this workspace. When you draw the first sketching, it is already about defining the correct proportions of the subject. One can work out various methods, which facilitate the drawing with appropriate proportions. Such methods are for example the grid method, the construction with simple geometric bodies or the drawing with free orientation lines.
.jpg)
The created sketch is now the starting point for the following steps, so you should already draw with sufficient care here.
Starting from this very coarse sketch, one begins to create a more precise preliminary drawing. This preliminary drawing already contains a lot of details - how many details is a matter of personal preference and of course also depends on how detailed the finished drawing is supposed to be.
The preliminary drawing does not yet contain any shadows and thus leaves a pure line drawing.
.jpg)
The next step is the shading of the preliminary drawing. Shading means that you represent the shadows of the subject. With the shading your drawing will get its three-dimensional appearance and will look realistic.
For shading you will have to determine a certain drawing medium and a drawing technique for the first time. Thus you can shade the picture with pencil, pastel chalk, coal or even colored pencils. The drawing technique can be hatching, shading, blurring, etc.
If you work with colorful pastel chalks or colored pencils, the color scheme comes into play. Also when painting with acrylic, oil, gouage, watercolors, etc., you paint not only the shadows but also the colors.
.jpg)
After shading the picture is almost done. What is missing is just the final touch.
In the last step, you should consider your own drawing critically again. Compare your drawing again exactly with the reference (photo, model, etc.). In doing so, you try to determine whether everything fits as it is or whether you have to adjust something.
The error correction can here also simply be described as a refinement of the image, since at this stage no major changes can be made. In principle, only shadows can be intensified, diminished or individual points of light can be worked out. In addition, to reduce shadows, a kneaded eraser is very well suited. If you intend to work out single spots of lights it is best to use an pen eraser.
.jpg)
In four steps, we create a picture from the white sheet of paper to a finished drawing. As simple as this description may sound, there is, of course, a lot of work behind it. However, the procedure described here is the standard procedure for drawing a picture step by step.
You will find many, many more tips and tricks how to draw on this website.
This website is about how to draw and paint. You will learn to use pencil and brush and how to drawn and paint your own pictures.